Web Based Asset Tracking System
DeliveryPoD Asset Track is a modern, web based Asset Tracking System that allows you to take control of your fixed and mobile assets.
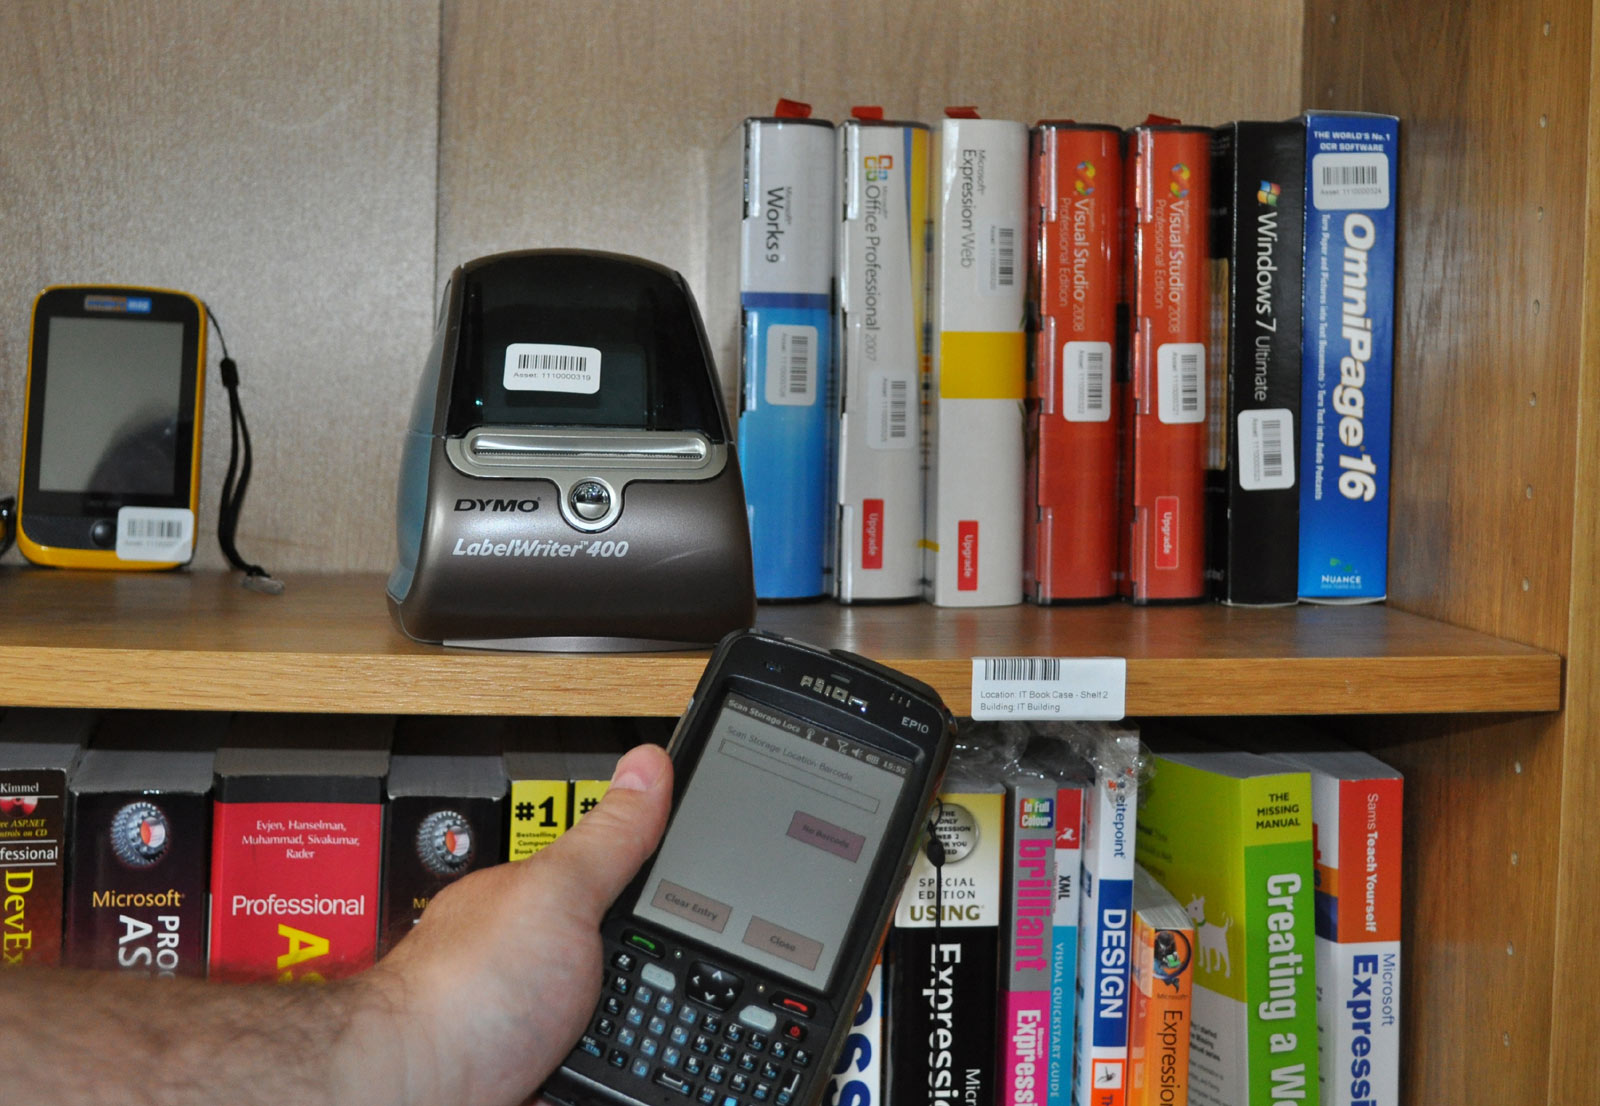
Using a combination of barcodes, RFID, mobile computers and advanced web based software you can track any type of asset such as IT Equipment, Room Keys, Passes, Audio Visual Equipment and Tools.
Full Tracking
Customer configurable mobile computer tracking stages allow you to track assets no matter what journey they go on.
- Buildings, Locations, Trolleys and Containers
- Option to print barcodes (quicker than select on menu)
- Vehicles and Couriers
- Loans and Allocations to staff and customers
- Signature Capture, Name, Damage and Failed Delivery
- Take a photograph (damage reporting / inspection etc)
- Retires an Asset, Level of user who sees stage in report…
You can give each stage a name, tick the boxes and deploy it to the mobile computer in less than 30 seconds!
Configurable Tracking Stages
We wanted DeliveryPoD Asset Track to be the easiest system to use on the market. To achieve this goal, we put in fully configurable tracking stages, so everything mould around how you wish to work.
We will configure the tracking stages for you after talking about how you work. However you can edit them, delete them and add new ones yourself. It is really easy:
- Type in a Name for the Tracking Stage
- Tick the boxes on the screen
- Click on “Save”
Only the tracking stages you decide to use are shown on menu’s, so there is no clutter and staff see descriptions that mean something to them.
The tick boxes allow you to control what the mobile computer will prompt the user for.
Powerful, Flexible and Easy to Use
The level of control that the configurable tracking stages gives to you is truly remarkable.
The following “location” of Assets is all supported:
- Buildings / Sites
- Physical Locations
- Trolleys
- Vehicles
- Depots
- Couriers
- People (both staff and customers)

Other things you may ask your tracking stage to do are:
- Obtain a Signature
- Obtain a Name
- Select a Person / Type in a Person (allocations or loans)
- Take a Photograph
- Record a Vehicle Registration
- Record the Courier, Vehicle Registration, Drivers Name
- Record Damage by Text Entry and Photograph
- Record Failed Stages (e.g. Nobody To Sign) Text and Photo
- Retire an Asset
Imagine you had valuable assets that needed to go from a location in Building A to a Person on another site. With DeliveryPoD you can go to this level (if you wish):
- Scan Onto Trolley
- Scan into Mailroom (perhaps scan location barcode)
- Scan Onto Courier (record Courier, Registration, Driver Name and Signature)
- Scan Into Location (Site 2, which removes it from couriers list)
- Scan Onto Trolley
- Allocate to Person (select person and ask to sign)
At every step you know where the asset is. For example if it was scanned onto the courier but not scanned off at the other end you know the courier should still have the asset! You also know the Courier, drivers name, vehicle registration and have their drivers signature.
Automatic Email Requests
Did you know, you can also configure automatic emails to be sent when a particular tracking stage is completed or fails to complete?
This means you can do things such as ask DeliveryPoD to send an email when an Asset is Scanned into a Location or perhaps Loaded onto a Courier.
You can make this apply to all assets, individual assets, asset categories, assets with a set description or for assets owned by a set person or department.
You can even set emails to notify somebody when a delivery could not be completed for say all assets in say the “X-Ray Parts” category of assets.
Linking Into Reports
The tracking stages are closely linked to the DeliveryPoD Reports.
If you need to see what is on a Mail Trolley, Vehicle, Building, Location, Loaned to Person, Allocated to Person etc – you can just go to that report to get a full list of Assets
Full Audit Trail
The tracking reports allow to see precisely where an item is along with where it has been.
DeliveryPoD Asset Track provides a full audit trail (tracking history) for every asset in the system.
To access the full details of an asset and its audit trail / tracking history, you simply find the asset you are interested in any of Asset Tracks reports / searches, select that asset and click on the “Tracking Report” button.
Export to PDF
The on screen report can be exported to Adobe PDF format, so it can be emailed, printed or saved to disk.
Please click on this icon to see an actual PDF Tracking Report.
Drill Down From Any Report
You can quickly access a tracking report / audit trail from any Search / Report.
This is really convenient, so if you are in the Location Manifest report and want to look at an assets detail, you can just drill down from there to see the full audit trail. This applies to all reports.
What is in a Tracking Report?
The tracking report has two sections:
- Asset Information
The top section lists all the information about the asset, such as the Description, Category, Owner, Date Commissioned as well as any user defined fields. - Tracking Information / Audit Trail
The second section shows you where the asset is and where it has been. The top most entry tells you the last known location of the asset, but you can look further down to see every bit of tracking history.
If you look in the Extra Information column, you can see things such as the name of the person who scanned the asset, details of any Courier or Vehicle the Asset was loaded onto, the physical location an asset was scanned into etc.
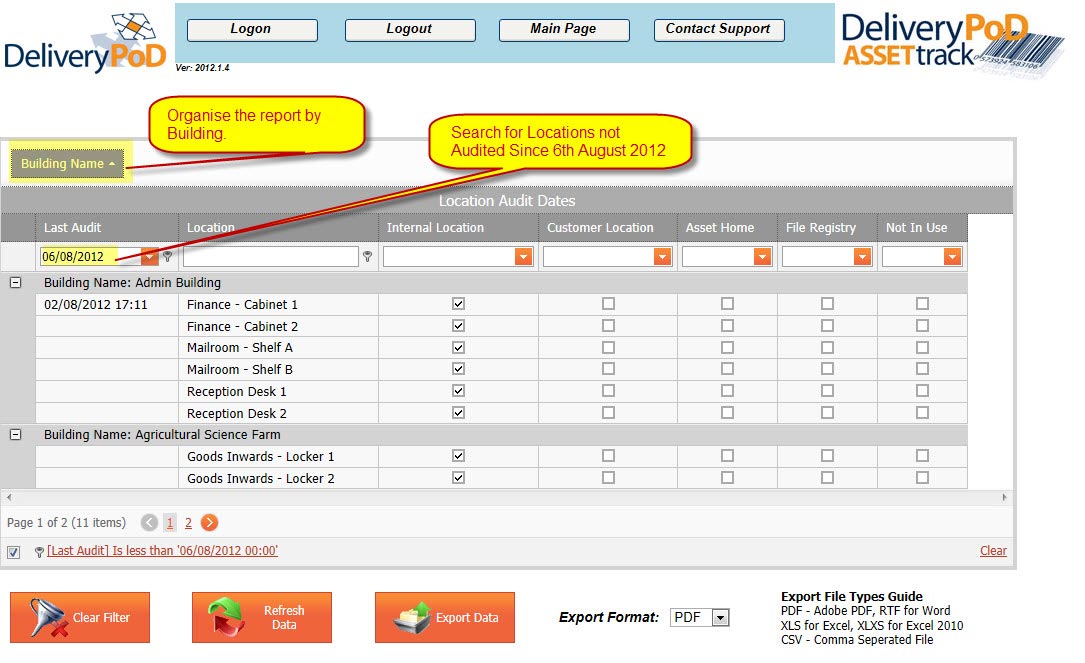
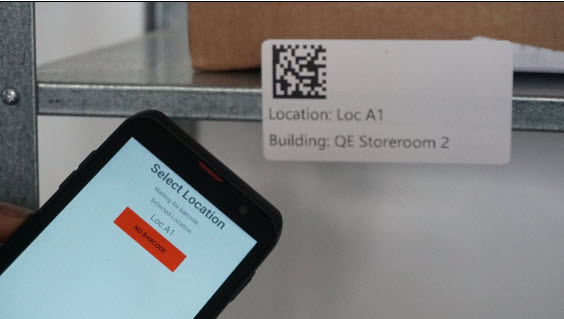
Location Audits
Any system may think that items are in a particular location, but are they? What if somebody has moved something without it being recorded or perhaps something has been stolen.
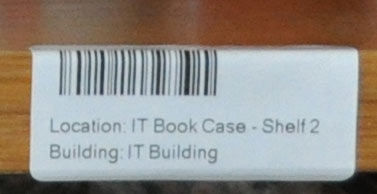
A “Location Audit” function is built into the Mobile Computer / Smartphone software that allows a user to go to Locations, Scan the Location Barcode (or select via a menu), then scan the items in that location:
- Items scanned in the Location that are not meant to be in that location are moved in the system to the location they are actually at
- Items that should be in the Location, but are not are removed from the location and marked as “Missing” until they are scanned by somebody else at some point.
Automatic Emails can be set up to notify people when items marked as being missing are scanned.
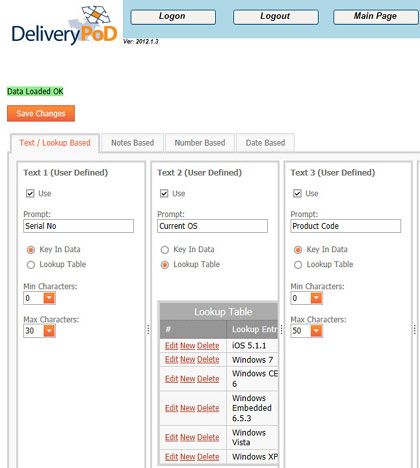
User Defined Fields
The extensive use of user defined fields allows us to set up fields to record information that is important to you. Our user defined fields are what we call “Smart Fields” and have advanced features.
We will set up the User Defined Fields for you when we install and configure the system. However you can change them at any time, as it is really easy to do.
The above screen shot shows part of the Text / Lookup user defined set up screen.
Notice that you can set up the fields for the user to type text into or to select an entry from a drop down menu (you enter the options in a lookup table).
You get the following User Defined Field options:
- 10 Text / Lookup Table Fields
- 1 Notes Based Field
- 5 Number / Currency Fields
- 2 Date Based Fields
Benefits of User Defined Fields
By using User Defined Fields, we aim to allow you to capture just the information you need, rather than prompting you to enter data you do not wish to enter. Even if you leave the boxes blank, they are a distraction and take up valuable screen space.
Since you just see what you need to, our software looks much easier to use than other systems.
The obvious benefit is that if you need to record something that is really unique to you – you can do this quickly and easily.
The above screen shows how few fields you may need if you just record what you need. This looks simpler to staff, so they view it as easy to use. They also do not spend time recording data that you just do not need.
Data Entry Knows What Type of Field
The differences between the user defined field types are known in all of the data entry areas of the system. Data entry then provides the best way for entering the data:
- Lookup Tables – Drop down menus
- Text – Text Boxes with minimum and maximum length validation
- Dates – Calendars with quick month / year changes
- Numbers / Currency – Dedicated number entry boxes
Reports Know the Type of Field
Reports know what type of field each user defined field is and act intelligently:
- Date based fields are show as dates. Search options show calendars and you can set a search of “between” two dates.
- Number based fields are shown as numbers with decimal points and number based entry system.
- Text based fields are shown as text boxes.

In the above screen shot, “Current OS”, “Warranty Expires” and “Fixed Repair Cost” are User Defined Fields.
Notice that the report is aware that “Warranty Expires” is a Date Field, so it offers a Calendar for selecting a date (it also allows you to search for data that is before a date, after a date or between two dates).
The “Fixed Repair Cost” is a number field, so it displays it as a number / currency. Filtering options reflect that it is a number field as well.
If you define a field as a Lookup Table, the user will be prompted to select an option from a drop down menu.
Single PC to Corporate Enterperise
Our system is web based and scalelable from a single standalone PC installation right the way through to hundreds of users with the website hosted on your (or our) server.
Our Asset Tracking System is designed and priced for organisations of all sizes.
The system is web based, so it can be installed on anything from a single standalone PC through to a powerful corporate server allowing thousands of people across multiple sites to use the system.
It is simply a case of selecting the right level of hardware and database for the number of users you have.
Single PC Installation
You can run DeliveryPoD Asset Track on a single PC with one mobile computer. Quite a few people run DeliveryPoD on a single PC and it works well.
If the PC is connected to your email system, you can still use the automatic email facilities. If the PC is on your network, you can access the website from other PC’s (although the number of concurrent users will be limited).
Should you wish to upgrade later and move the system to your server, this is possible and the data will be moved across as well.
Software Licensing is based on the number of users, so we are price competitive even for small systems (against other full service providers – i.e. not people that just ship you boxes!).
We will install a Microsoft SQL Express database (free of charge database) to store the data.
Server Installation
Designed as a Web Based application, DeliveryPoD Asset Track will normally be installed on a customers Server (or third party server).
Once installed, anyone with a web browser can access the website and system.
In almost all cases Microsoft SQL Express (free of charge) will be more than adequate, however the system can utilise higher performance editions of Microsoft SQL if required.
Multi Site Asset Tracking
DeliveryPoD can allow you to keep track of your assets across multiple sites all on the same system.
Android Smartphones / Mobile Computers
Our advanced mobile computer software allows you to capture signatures, names, scan barcodes (Asset, Location, Mail Trolley etc) and take digital photographs to record things such as damage.
Data can be sent via Desk Cradles or instantly using your Wireless LAN or Mobile Phone Network (GPRS, 3G etc).
Our software supports the use Android Smartphones / Mobile Computers.
Reports and Searches
Easy to use, state of the art reports and search functions allow you to quickly find the information you are looking for. You can search / filter on any column, group data on any columns, drag columns into the order you want and it even remembers your settings.
inally you can export your report to Adobe PDF, Microsoft Excel, Word (RTF) file formats. You can even export to CSV file formats so you can import the data easily into other software you may have.
In any report you can click on the Asset Row and quickly see a Tracking Report for that asset.
What Reports are Provided?
Generic Search for any Asset
Physical Location – what assets are in:
- Building Manifest – assets in each building
- Location Manifest – assets within a physical location
- Mail Trolley Manifest – assets on mail trolleys
- Vehicle Manifest – assets on vehicles
- Depot Manifest – assets in depots
- Courier Manifest – assets on couriers
Loans And Allocations to People
- Allocated – assets allocated to people
- Allocation History – A full audit trail of all allocations (past and present)
- On Loan – assets on loan with staff / customers
- Loan History – a full trail of all loans (past and present) so you can analyse the data to determine things such as staff and customers who you loan to the most, the most popular reasons for loaning assets etc.
- Overdue Loans – assets on loan, past their due back date
Problems
- Damage Reports – damage reports with photographs
- Cant Complete Reports – Failed delivery attempts, with photographs.
- Missing Assets – assets registered as being missing
Condition, Creation and Retirement
- Assets by Condition – assets by last known condition
- Planned Retirement – assets by expected retirement date
- Retired Assets – a list of retired assets
- Assets by Creation Date – assets organised by creation date
- Depreciation – The value of assets on set days, using depreciation calculations.
Report Features
The following features are standard in every report:
To explain the features, I am using a situation where an Electrical Engineer has arrived on site and needs to know where all the Assets are in the Applied Science Building that need PAT Testing (which we set up as a user defined field). The examples below show how we can easily find the information we need:
- Drag and Drop Columns
You drag columns into any order, just by dragging the column title into the position you want it.
Similarly you can adjust the width of each column, by just dragging its border. - Search Filter
We provide two types of Search Filter:
Simple Filter
Simply type in any search criteria at the top of each column. A second after you stop typing, the grid will just show the data that matches your search.
You can specify the type of data match. If you are sure the text you are trying to match on is at the Start of the data, use “Starts With”, but if it might be anywhere in the data, select “Contains”.Power Filter
A more powerful filter is available as well (selected at the bottom of the grid).
The first part of the filter (blue) lists all of the column names in the report even if they are not visible on the screen. You can select the column to apply the filter on, by left clicking on the blue text:
After selecting the column, you click on the Green Text to select the type of comparison you want:
Finally you click on the Grey text to enter the data you are searching on (in the case below I typed in Applied Science):
In the above example I am looking for Assets in the “Applied Science” building that need a PAT Test.
Grouping
You can group on columns to organise data by the column / columns of your choice. - Sort On Any Column
You can sort A to Z and Z to A, simply by left clicking on the column header. - Export Data from Any Report
All reports can be exported to Adobe PDF, Microsoft Excel, RTF (for Microsoft Word) and CSV files.
Web Based System
Accessing the system could not be easier, just use the web browser on your PC, Laptop, Apple Mac, Smartphone or Tablet device (e.g. Apple iPad, Android Tablet etc).
Of course if your device has a Wireless link to your network / website you can access Searches / Reports, wherever you are in coverage.
The website can be hosted on your private network (intranet), world wide web or even on a single PC.
There is no charge for accessing searches / reports. You can simply email the Web Address, User Name and Password to each person you want to provide access to.
Automatic Email Requests
Automatic Email requests can be set up to inform people when key events occur, such as a missing asset is scanned, damage is reported or a particular tracking stage is completed or failed. This can be for
- All Assets
- A Category of Asset (such as “Safety Equipement”
- Assets matching a fixed Description
- A Single Asset.
- Assets On Loan – with a period before or after the due back time
Staff responsible for keeping track of assets are catered for and so is everybody else. For example a Department Manager may want to be kept informed of when their departments iPad’s is loaned out, or perhaps when a location audit finds that a Laptop Computer belonging to their department is not in the location it was meant to be in.
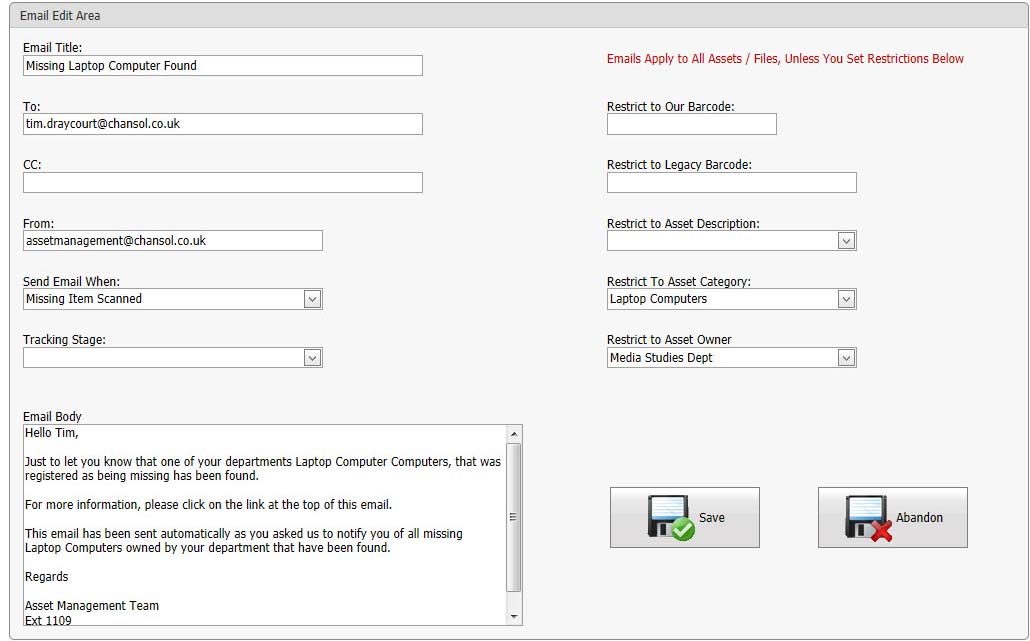
Setting Up Email Requests
You can set up as many Email requests as you like and better still, it is so easy to do.
After logging in, you click on the Email Request button and click on the “New Email Request” button and fill in the form:
- Provide a “Subject” for the Email
- Enter the To, CC and From Addresses
- Select what causes the Email to be sent
- Set Filters to narrow down when the email request applies
- Enter the message
- Details of the asset are added automatically
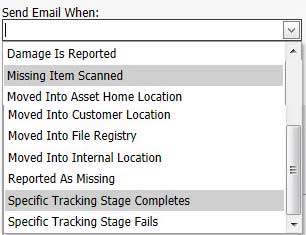
Events that Can Be used to Trigger an Email
When setting up the Email request you can specify, what causes the email to be sent. Here are the main options:
- Asset On Loan gets within a Set Period Before / After being Due Back
When Assets are loaned out a Due Back date and time are agreed. You can set an email to automatically notify the person who has the item that it is due back in 8 hours time or perhaps notify them they are late, as it is now 2 days past the due back time and the asset has still not been booked back in.
You can have as many of these email requests as you like. We call them “Auto Nag” emails. - Asset goes through a specific Tracking Stage
- You then set the Tracking Stage
- Examples – Loaned, Allocated, Delivered, Van Loaded…
- Asset Fails to complete a specific stage
- You then set the Tracking Stage
- Often used to notify people on failed delivery attempt
- Damage is reported for the asset
- Reported As Missing
- Asset Reported as Missing is Found (Scanned)
- Moved to a Asset Home Location
- Moved to a File Registry Location
- Moved to a Customer Location
- Moved to an Internal Location
- Moved to Any Location
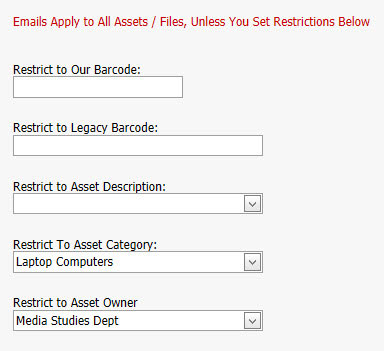
Email Filters
Filters allow you to set very precisely which Assets the email will apply to. Without any filter, the email will apply to all Assets in the system, but you can narrow this down by any one or any combination of the following:
- Asset Barcode
- Asset Description
- Asset Category
- Owner
The combination of using more than one filter proves to be very flexible. For example – restrict to “Assets Owned by the Accounts Department” that are in “Asset Category: IT Equipment”.
Installation, Training And Support
We provide a full service company that provides everything from the mobile computers, barcode equipment through to onsite training of your staff and support.
Installation
Our engineers will come onsite to help install the software and hardware.
Prior to installation we will send our installation guide to your IT Department so that they are fully briefed on what needs to be done before we arrive and whilst we are on site.
We are often able to help with importing data or setting up a connection to an existing database, so you can import data with a single click.
Training
After talking to you, we will agree on the best form of training for your organisation. This might take one or multiple of the following options:
The most common option is actually to train one person to trainer level and then train the other users to a basic level. We also find spending an hour or two with every person as they start to use the system in earnest is really useful:
- Train The Trainer
- Train All Users
In any event we will come onsite to ensure your staff are given first class training.
The most common option is actually to train one person to trainer level and then train the other users to a basic level. We also find spending an hour or two with every person as they start to use the system in earnest is really useful.

Support
We provide Telephone and Email support during UK office hours.
Support is provided by us, the people that produced the system, all based in the UK (United Kingdom).
Support contracts are available to all customers and cover both software and hardware.